
Technical Tip
You can also display this screen by selecting EDIT | HEADER on the Internal Job Entry screen - refer to "Internal Job Entry - Edit - Header".
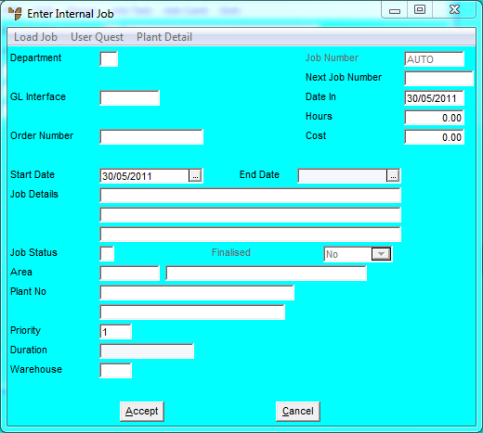
The header details for an internal job are entered and maintained on the Enter Internal Job screen. Whenever you create a new internal job, or load an existing one, Micronet displays the Enter Internal Job screen where you enter the main details of the job.
Refer to "Creating a New Internal Job" or "Recalling an Internal Job".
Micronet displays the Enter Internal Job screen.
|
|
|
Technical Tip You can also display this screen by selecting EDIT | HEADER on the Internal Job Entry screen - refer to "Internal Job Entry - Edit - Header". |
|
|
Field |
Value |
|
|
Department |
Enter the job department (A-Z) for this job. You can also press Tab or Enter to select a department. You must select an internal job department. |
|
GL Interface |
Micronet displays the GL interface record for the selected job department as set in the Department master file (refer to "Adding a New Department"). This sets out the General Ledger accounts to which the job's combined costs (Work In Progress – WIP) for raw materials and labour are automatically transferred by Micronet. For more information about GL interface records, refer to "Setting up and Configuring MJC". You can change the GL interface record if required. You can also press spacebar then Enter to select a GL interface record. |
|
| Order Number | Enter the order number or internal reference for this job, e.g. requisition number, works number, etc. | |
| Job Number |
Enter the job number if required. This field is only enabled if the Manual Job Number field is set to Yes in the Department master file (refer to "File - Department"). Otherwise, this field is set to AUTO and Micronet automatically allocates the next job number. |
|
| Next Job Number | Micronet displays the job number for this job. | |
| Date In | Micronet displays the date the job was created. | |
| Hours | Micronet displays the actual hours worked on this job to date. | |
| Cost | Micronet displays the cost of sales for the job to date, i.e. the cost of materials, labour and any other costs. | |
| Start Date | Enter the start or due date for this job. Micronet can produce reports for jobs committed to any particular date or date range. | |
| End Date | Enter a job ending date if required, or leave this field blank. This is used by inquiries and reports within MJC. | |
| Job Details | Enter up to three lines of description for the job, e.g. "Maintenance", "R&D Job# 6151", "Cleaning", etc. | |
| Job Status |
Enter the job status or accept the default job status as set in the Department master file (refer to "Adding a New Department"). If this field is greyed, it means that the job is in a status that cannot be changed (as set in the Job Status table), or that the job has been finalised. In these cases, there is no way to change the job status, regardless of your user security level. You can only change the job status if the job status allows status changes (as set in the Job Status table) AND if your user security allows it AND if the job has not yet been finalised. For more information about the Job Status Table, refer to "Edit - Applications - MJC - Job Status Table". |
|
| Finalised |
This field is only enabled if your user security allows you to finalise jobs. If the job is complete and you want to mark it as finalised in Micronet, select Yes. Note that once a job is finalised, you cannot change any details. For information on allowing users to finalise jobs, refer to "Maintenance - Edit UserIDs - 7. MJC Security". |
|
| Area |
Enter the job area to assign this job to, or accept the default as set in the Department master file (refer to "Adding a New Department"). You can delete the default area and press Tab or Enter to select a different area. |
|
| Plant No |
If you have the Micronet Plant + Maintenance (MPM) module installed as part of MJC, enter the ID of any item of plant or equipment to be assigned to this job. You can press spacebar then Enter to select from a list of plant items. You can only assign one item of plant per job. You can add or view narrative text for the plant item by pressing F5. For more information, refer to "Adding or Viewing Narrative Text". |
|
| Priority | Enter the priority code for this job, e.g. urgent or normal. Press Tab or Enter to select from a list of priority codes. These are setup in the Priority Codes master file (refer to "File - Priority Codes"). | |
| Duration | Enter the estimated duration of this job in hours. | |
| Warehouse |
Enter the warehouse that is going to be used for the transfer of materials, or accept the default. You can delete the default warehouse and press Tab or Enter to select a different warehouse. |
Micronet displays the Internal Job Entry screen.
|
|
|
Technical Tip If you have any user defined questions, Micronet displays them first. |